A good light system can fundamentally change the way you ride. Lights afford longer rides, more variety in your ride plans, and a landscape that's entirely your own. Light can really change the way you think about what is possible.
Choosing the best light system - as with every piece of cycling equipment - is all about understanding how you ride. There are a thousand ways to approach lighting. Any quick perusal of current light offerings provides more than 100 models from dozens of brands.
Ride Headquarters approach to light systems is unusual, and it encompasses variables many riders don't deal with regarding lights:
Ability to ride all night - through the longest 15-hour New England December darkness.

Lights that work really well in mixed-terrain: Stable, durable, and targeted.
Lights that function in all weather conditions: Rain, snow, and zero degree temperature.
Systems thinking - it's not one light; it's more like four or five that work together as a system.
Riding in very cold temperature -- sub 20 degrees.
Our favorite setups aren't fancy or flashy; they're simple and logical.
Here's a short overview of our preferences.
Headlights
What's Useful for Mixed-Terrain Riding
We haven't found any good articles about riding mixed-terrain with lights. We think that's in part because not many people do it. We do, however, find that light recommendations for road riding doesn't hold up entirely for mixed terrain. And, lights for 24-hour mountain bike races - while intuitively appropriate - don't usually have much relevance to mixed-terrain self-supported rides. Here are our views on optimizing for mixed-terrain.

In order of importance, here's our views:
Time: Ability to roll throughout a night. In New England this is anywhere from about 8-hours to 15-hours. This is where most lights falter; nearly every light we've used doesn't come close to the promised burn times.
Lumens: This is directly related to lumens; more lumens means less time for a given number or grams.
Stability - Mounting System: bar mount and helmet mount. Having a light that 'droops' while riding is, at best, super irritating, and at worst, very dangerous.
Weight: This primarily relates to helmet mount lights. We find that anything over about 140 grams becomes a nuisance by enough hour four. Endless jostling on the trails can lead to neck pain.
Helmet Mount: We strongly recommend a light with a well integrated helmet mount. This relates to "Stability" above; if the helmet mount doesn't work well it's dangerous.
Water Resistance & Toughness: You'll get stuck in a downpour at some point. Once a light gets water in it, it's pretty much done forever.
What don't we particularly care about:
Beam pattern.
Lumens vs. Lux.
Charge time. Good lights take forever to charge. Frustrating but it simply requires a bit of planning to manage.
Beam Pattern
This doesn't really matter. We've tried dozens of light systems and find that the theory of beam patter optimization doesn't really seem to match to what we like best. And, riding off-road, beam pattern seems to go out the window. The needs of beam for offroad are pretty different than the needs of road beam pattern. Regardless, we find the research on beam patterns to be minutia that doesn't make our short list of important factors in choosing the best lights for all night mixed-terrain riding. If we had to choose, all things equal we like narrower beams; see below for an explanation of why.
Useful Lumens
Good luck if you want to dig into the world of lumens, lux, and watts.
Lumens vs. lux: Essentially, the narrower the beam, the more directed the lumens. 200 lumens in a wide beam is a lot dimmer than 200 lumens in a narrow beam. Therefore, two different lights that claims 200 lumens won't necessarily look equally bright. We tend toward more focused beams over wide dispersal beams. Lots of disbursement isn't helpful on the trail, and we don't find it makes much of a difference on the road. Also, a narrow beam wastes fewer lumens on the peripheral margins - meaning the battery lasts longer for a given number of useable lumens.
Lumens and watts: One watt is 683 lumens. So, a taillight of one watt is really painfully bright.
How many lumens do you you need to ride at pace on the trail? It really depends on your pace. An average trail rider will likely be fine with about 200 lumens minimum; ideal is about 250-400 lumens. Some riders can ride really fast offroad at night but we find anything above 400 lumens doesn't help us go faster but burns battery life faster. conversely, 100 lumens is definitely low for riding at speed on trails; but you can ride at 100 lumens - just probably not at race-pace. If you're down to your last light, ride at your lowest setting; 100 lumens is infinitely better than no light.
Three Types of Power Sources
Battery Operated
Internal batteries: The batteries are part of the torch itself. Here there are two types:
Integrated Batteries:
Benefits over replaceable batteries:
Lightest weight system available - more lumens per hour per gram.
Better for helmet mounting
Don't rotate on a handlebar
Well sealed from the elements - particularly rain.
Considerations compared to replaceable batteries: long distance bikepacking or touring - see below - you won't be able to keep them charged for days on end.
Replaceable Batteries:
Benefits over integrated batteries:
Able to get replacement batteries in any town. Not likely to every run out of power.
Good for long distance bikepacking of more than four evenings out where you intend to be riding in the dark for many hours - early morning or late night. Easy to carry spare batteries.
Considerations compared to integrated batteries:
Heavier than integrated lights
Not well sealed against the elements
Disposable batteries are more wasteful. Rechargeable batteries work well, though.
External batteries - two part designs that use a cable between battery and torch. The short answer here is that cost per lumen:minute:gram is worse than on lights with internal batteries. Five years ago we would have said otherwise. However, times have changed. For example, two Light & Motion Urban 650s offer 300 lumens at 6-hours run-time at about 240 grams total. And you can mount one on bars and one on your helmet. Conversely, for external battery setup, the Nightrider PRO 1800 Race light is a good example: $350 for 400 lumens from one light for 6-hours and 484 grams. Only one light. Not something you'd want to mount on your helmet. Simply not as useful.
One potential benefit of external battery lights is that you can carry spare batteries. In theory these should be weight effective method of getting more hours of light. However, the packs often weigh-in at around as much as a good integrated light setup.
Benefits over internal integrated battery lights:
None that we can find. Claims of more minutes per gram, but our testing doesn't corroborate those claims.
Considerations relative to internal integrated battery lights:
Having to mount a separate battery on your bike is a pain.
Where do you put the battery? on the drop of the drop bar. scratches frame. Seems trivial but becomes a pain.
Heavy on your helmet.
Batteries are not usually replaceable. But you can carry battery pack and spare battery packs. Heavy and frustrating.
Generator Lights
Generator lights can be great! And it's a topic for another day. They tend to be good for:
Multi-day rides where relying on batteries can be a problem.
Road riding rather than trail riding - relatively low lumens
If you need a power generation source for phones, gps, etc.
Mounting - Where & How
There are two basic systems: bike mounting or helmet mounting. On the bike, about 90% of the time we're talking handlebar mounts. There are a couple exceptions to this, but for the most part we recommend bar mounting.
Bar Mounted:
Benefits over helmet mount:
You can see how much battery time remains.
The best way to use an external battery light system - due to the weight of the system we're not fans of helmet mounting them.
Considerations compared to helmet mount:
Terrible for tight turns in the woods. You will definitely have trouble seeing around corners.
For long rides many riders use handlebar bags. Bar bags can get in the path of a handlebar mounted light; solutions to this challenge can be tricky: Fork crown mounts and fork leg mounts are the two most common solutions; neither of which is ideal.
Helmet Mounted:
We're big fans of helmet mounted lights. If we only have one light left, we make sure it's helmet mounted.
Benefits over handlebar mount:
Light where you want it; tight corners, shadowy rocks and foliage are no problem when you can use your head to get a better look at what's in the shadows.
Light movement control: We find that being able to move the light source from side to side, even a few degrees, helps tremendously with depth perception and for determining items in a more three dimensional way.
Higher mounting tends to be better for seeing in most situations. You can see over obstacles more easily.
Considerations compared to handlebar mount:
Can get knocked hard by trees. Be careful with low hanging branches.
Reduced depth perception; as the light source gets higher the shadows get shorter and therefore it's more challenging to judge distances.
Heavy on your head after five hours. We've heard many a story about sore necks due to helmet mounted lights. While a 150 gram light doesn't sound like much, it's not well distributed on the helmet and many hours of riding is tiring for any neck. We find that the tipping point seems to be at about 100 grams. Of course, this depends on the weight of helmet you're starting with, and what you're used to.
Typically not recommended for external battery pack lights because they're unwieldy and heavy.
Difficult to determine how many more minutes of juice you have left because you can't see the light.
Helmet and bar mount together: The best of both worlds. We think that 150-200 lumens on the bar/fork crown and 150-200 lumens on a headlamp is a perfect combination.
Fork Mounted: If you have a generator light, this is where most manufacturers recommend placement. Beam patterns tend to be optimized for this placement.
General Mounting Notes
Mounting height - higher is better: All things equal, drivers can see higher lights more easily than lower lights. This is one of the many reasons that helmet mounted lights are nice. Note that most generator light patterns have been optimized for mounting on the fork crown; they don't like to sit too high. Also, higher tends to be better for trail riding because you can see over obstacles more easily. Higher mounting does shorten your depth of field but we find that's a good trade-off for better down-trail sight.
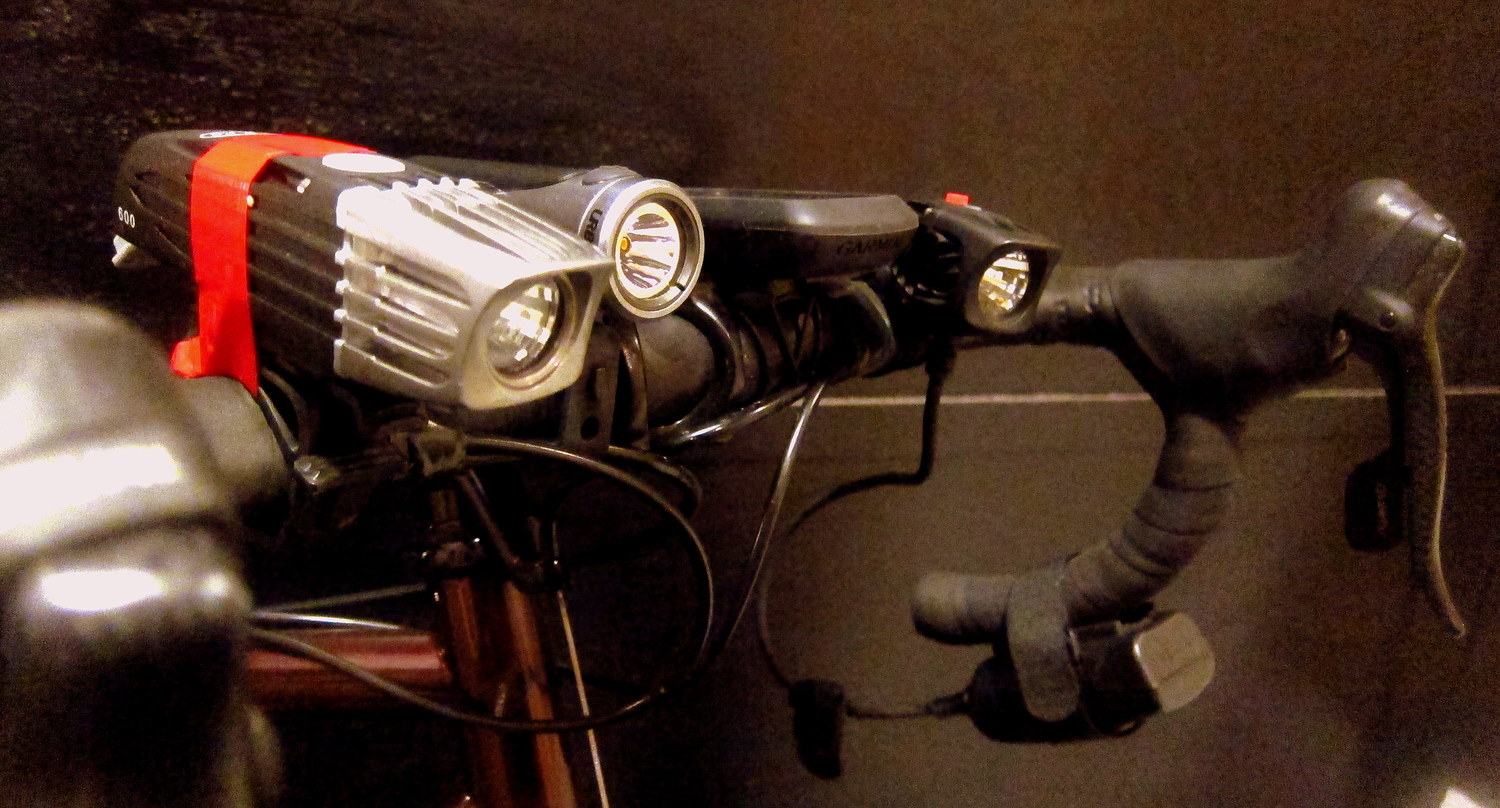
Mounting systems are terrible: System flaws are usually in two categories - stability and durability. This may seem like a dumb detail but it has become one of our primary deciding factors in light preferences. Mounting system flaws become significantly more apparent on mixed-terrain rides where there is a lot of jostling and hard use. The Light & Motion mounting system is by far the best we've used. Their Urban series - while not specifically designed for mixed-terrain - is optimal because they're self contained, so lightweight that they don't move during tough riding, and they work well as a helmet mounted light.
Taillights

The taillight conversation is fairly disparate from headlights - there's not a lot of crossover of usefulness between the two. Taillight requirements are much simpler because taillight function is very different from headlights.
For mixed-terrain riding the concerns we focus on are:
Durability
Battery Life
Weather Resistant
Mounting - simplicity and durability.
There are a lot of really bad taillights on the market. Durability and mounting options are two of the big weaknesses. Overall we much prefer battery operated taillights over USB rechargearble lights. The primary reason is run-time. See our recommendation at the end of this page.
Dnyamo taillights are a conversation for another day.
Flashing vs. Constant
How do you decide when to use the blinking mode or the constant on mode? This is pretty simple:
Flashing or Blinking: This setting is good for two main reasons: 1) it's more visible to drivers; and 2) it extends your battery life significantly - in the realm of 5 - 10 times longer battery life. We always use this setting unless the following is true:
Constant: If you're riding with a group, use the constant setting. It's irritating at best, and dangerous at worse, to be riding behind a bright blinking light. It really messes with your eyesight and depth perception. And, because you're with a group of riders, that also have taillights, your visibility to cars is great so blinking won't help visibility.
General Light Notes
Charge Time: Don't forget, the new generation of long-life batteries require hours to charge. Be prepared for a 4-5 hour charge time for just about any headlight you buy.
Riding Conditions

Riding in the Rain with Lights
We tend to set at higher lumens to cut through the rain.
Water proof isn't. Mount your light right-side up, otherwise, in heavy constant rain, your light could short out. Being in the rain at night with no lights is not something we recommend you aspire.
Light & Motion has a truly waterproof light, the Gobe - recommended for diving - but it is heavier than their Urbans so the lights tend to droop and rotate during mixed-terrain rides.
Riding in the Cold with Lights
Cold weather riding. Battery life is much shorter. Keep the spares in your pockets to keep them warm. And, when one battery starts to die, swap it out with a warm light and put the dead one in your pocket to warm it up; you'll get a bit more life out of it.
Ideal Mixed-Terrain Light System
Here are our primary recommendations for lights to get you through a full night of mixed-terrain riding:
Our Preferred Light System: Modular & Multiple
Headlights, rechargeable: Light & Motion Urban 650 and 850.
Helmet mount: 650 at 115 lumens; run-time is 6-hours. Get two of these so they'll last through the longest New England night.
Bar mount: Light & Motion 850 at 185 lumens run-time is 6-hours. Get two of these so they'll last through the entire night. A L&M 650 will work really well, too, if paired with a 650 level helmet mount light.
Taillight: PDW Danger Zone or similar.
That may seem too simple but this is the exact setup we've settled on after trying dozens of combinations over multiple years on every kind of imaginable long night ride - and all kinds of climates including snow, rain, desert, and forest.
This "Modular & Multiple" system is versatile, scaleable, shareable, rain friendly, easy, and damage tolerant.
Our Second Choice Light System: Batteries External & Internal
We're big fans of small self-contained lights - like the Light & Motion Urbans - but there is one exception to this. It's a small detail but worth mentioning. There are situations where an external battery pack light can be better than a self-contained light. Here's our recommended setup:
Headlights, rechargeable:
Bar mount: Long run-time with external rechargeable battery. We consider long run-time to be 12-hours at 200-300 lumens or longer on a single charge. Be careful regarding what you purchase; most bar mount external battery lights have the same basic run-time per lumen as a high quality internal battery light. Long run-time lights are very few; examples include: Gemini Light Duo and Lumicycle Explorer Enduro.
Helmet mount: Light & Motion Urban 650 and 850. 850 at 185 lumens run-time is 6-hours. Get two of these so they'll last through the entire night. An L&M 650 will work really well, too.
Taillight: PDW Danger Zone or similar.
Our Preferred Generator Light System
If you have a generator light system, here's our primary recommendation:
Headlight, generator: Edelux II with the SON28 generator front hub.
Headlight, rechargeable, helmet mount: Light & Motion Urban 650 and 850. A single 850 provides 6-hours of run-time at 185 lumens. Get two of these.
Taillight: PDW Danger Zone or similar.
These are not perfect for every situation - no light is, but they're pretty close to ideal for mixed-terrain night rides. We're always looking for ways to improve our light philosophy. What light system do you use?